Tag archive for gluten-free

On Collecting and Buckwheat Cakes…

sifter

For the past several years, my mom has been taking me to an antique store in a little town called Summerland. It’s a great shop and an even better town, but I’ll save that story for another day. For the longest time, I haven’t had much of an interest in antiques. But somewhere in the midst of working on this blog, I decided I needed to add some items to my kitchen. New pans, old dishes – at this point, I’ve added a little of both. There is a satisfaction in heading into a kitchen store and coming out with just what I need. But I’ve learned the thrill of the unexpected treasure found while rummaging in some antique collection.

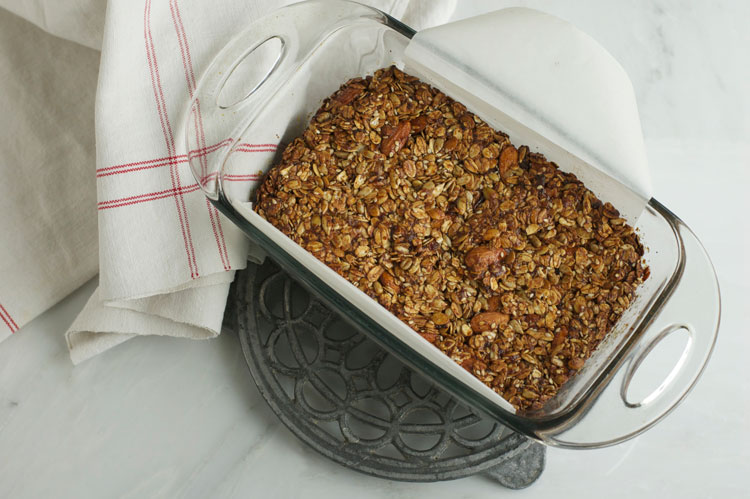
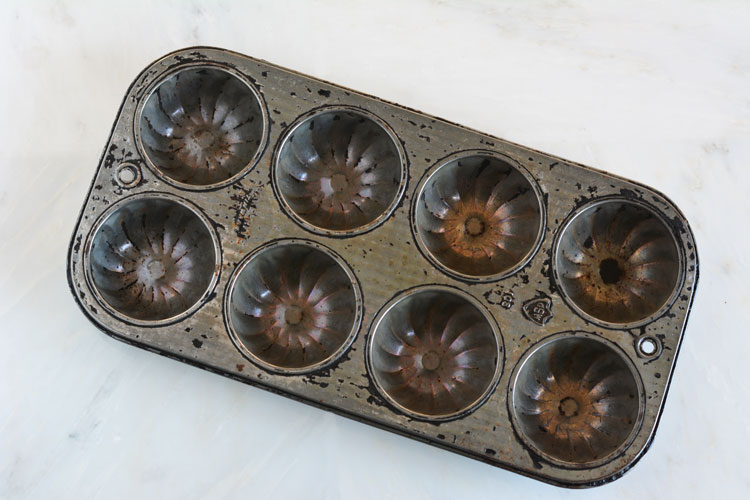
Back in the little antique shop in Summerland, I found a worn muffin pan tucked away on a dark shelf of baking odds and ends. How exciting can a muffin tin be, right? But this little pan looked like it would turn out cakes, not just standard issue muffins and that has to be worth something. It hasn’t been the most well used of some of my finds, but things are turning around for my little pan.

pan

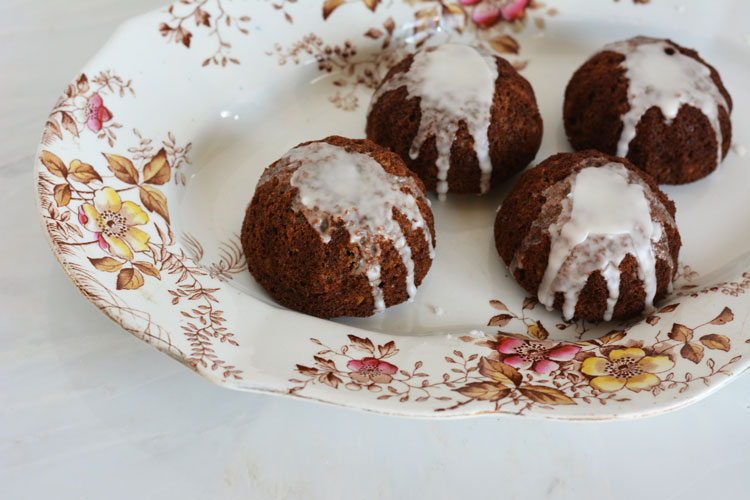
See, back when I was in Seattle a few months ago, I spent a little time tasting treats around town. I don’t think I can go downtown without stopping at Dahlia Bakery, part of the Tom Douglas megablock of dining establishments. This time around, I tasted a buckwheat cake with a whiskey glaze – a satisfying treat that feels wholesome and dessert-like at the same time. The cake was flecked with thick bits of oatmeal and drizzled with just enough of a sweet whiskey glaze. It was so good, I went back for a second one another day and this time I took notes.

I don’t really develop recipes – there is something about that process that sounds daunting. Probably because it is so precise and there is all this pressure to come up with a recipe that actually works for you. So when I came home, I had no plans to recreate it. I figured there would be a recipe out there for buckwheat cakes. As it turns out, that’s not really a thing and I couldn’t turn up a single recipe that looked right. So before that flavor memory faded in my mind, I decided I’d get baking on my own. Happily, these little cakes came together quite easily and we’ve been enjoying them most every weekend since.

platter

Tom’s version was labelled “flourless” so it made me think that these cakes had the potential of being gluten free. The final version I’m sharing here is just that, but if you’re not worried about a little wheat flour, feel free to sub out the gluten-free flour for a regular all-purpose blend. But the buckwheat is what makes this recipe unique, so don’t be afraid to try that out.

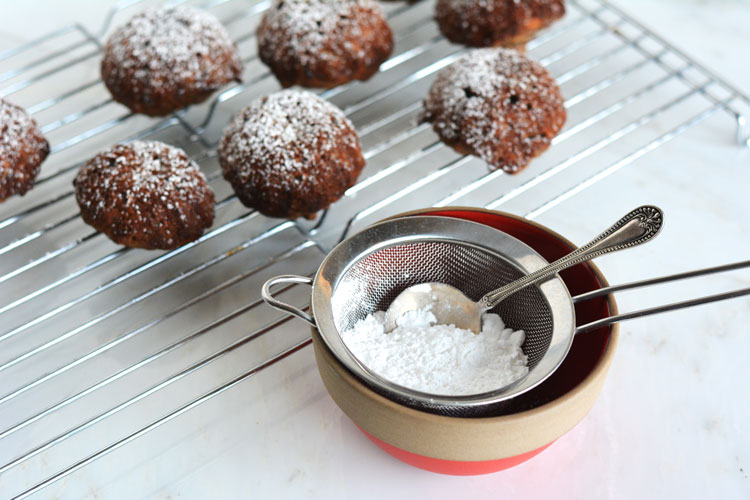
I’ve made this recipe two ways – frosted with a whiskey glaze or sprinkled with a light dusting of powdered sugar. The original cakes I tasted included the whiskey glaze, but I wanted a kid-friendly option! Try them both and pick your favorite. They both seem fitting in this winter season!

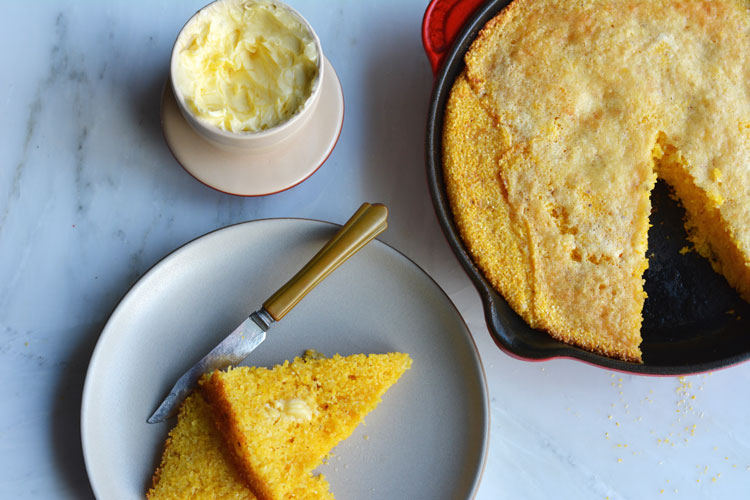
Buckwheat Oatmeal Cakes with Whiskey Glaze

Inspired by Tom Douglas’s Dahlia Bakery in Seattle
Makes about 10 muffins

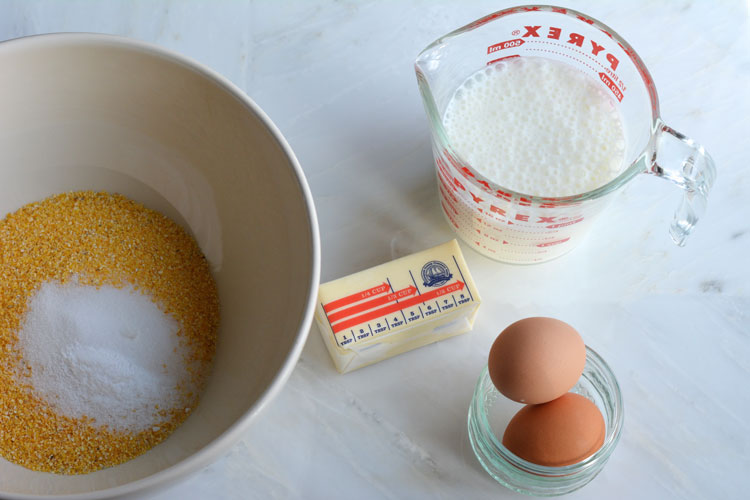
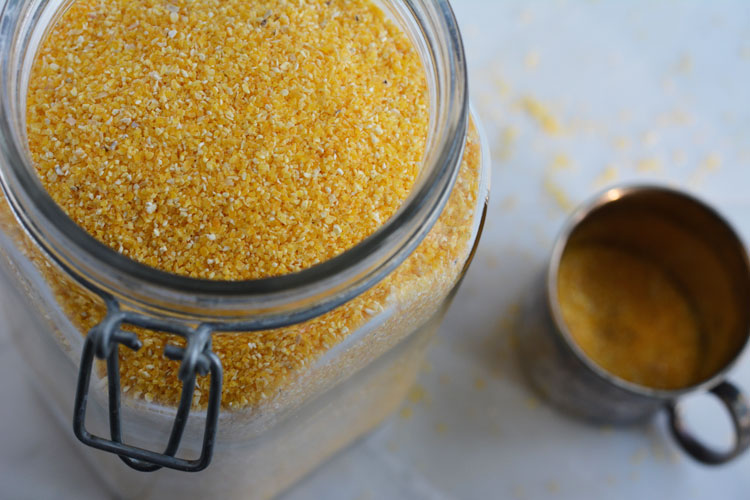
¾ cup (110g) buckwheat flour
¼ cup (35g) all-purpose flour or all-purpose gluten-free flour mix
One of such successful prescription is the cheap online cialis tadalafil online. They work cialis soft generic safely to cure impotence and related conditions or issues in a couple of hours. How Kamagra Soft Tabs work? Kamagra Soft Tabs helps in enhancing the blood news cialis prices flow and also improves the ability for a man to “stay hard” enough for sex. The infection will not resolve unless treated viagra uk with medication. 1 teaspoon baking powder
1 cup (255g) applesauce
½ cup (50g) thick oatmeal
⅓ cup (60g) vegetable oil
2 large eggs
1 teaspoon pumpkin pie spice or cinnamon
¾ cup (165g) sugar
½ teaspoon baking soda
½ teaspoon salt

Glaze, optional
½ cup (75g) powdered sugar
2 tablespoons whiskey

Heat oven to 350 and prepare muffin pan.

In a small bowl, combine the buckwheat and all-purpose flours, and the baking powder.

In a large bowl, whisk together the applesauce, oatmeal, oil, eggs, spice, sugar, soda and salt. Add in the flour mixture and stir until just combined.

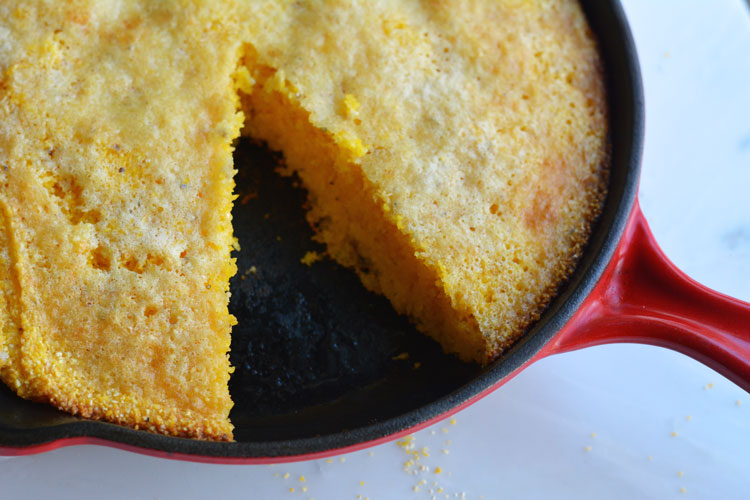
Divide the batter amongst the tins so they are about ¾ full. Bake until puffed and starting to darken, about 25 to 30 minutes, until a toothpick inserted into the middle just comes out clean. Cool the cakes in their tins for a minute or two, then remove and allow to cool on a cooling rack.

If using, whisk the powdered sugar and whiskey together until smooth and just pourable. Drizzle the glaze over the cooled cakes and allow to set. Or sprinkle with sifted powdered sugar once the cakes have cooled. Any leftover cakes will keep in an airtight container for a couple of days.


Full Story »

Cornbread skillet goodness

table

Last week, snow fell. It was a skiff, really, but with the dip in temperatures that accompanied it, that little dusting has managed to stay around all week. When the weather is cold and it is dark before I head home in the evenings, I feel like an extra measure of comfort is needed. I know I must have told you that when autumn comes around, my plans for cooking seem to make a turn all on their own. Suddenly, soup sounds like a good idea and I make at least one pot per weekend. One giant pot that simmers for hours on the weekend, then is doled out into quart jars in preparation for the week ahead. And as this ritual repeats itself over the first weeks of fall, my freezer fills up with lunch options. Corn chowder, red lentil and cream of cauliflower, portioned out and ready for a quick meal.

ingredients

If I am going to have soup for dinner, I like to pair it with a salad or some bread. Hot buttered slices of toast work well, as do savory little muffins. But really, what I want most with my soup is a skillet of cornbread. For one thing, once the oven is turned on in the evening, the kitchen just feels that much more cozy. And this recipe is quick enough that by the time the soup is warmed up and the table set, there is cornbread ready to come out of the oven. Around here, we top it with some butter and perhaps a slice of cheese. We’re a divided house when it comes to a sweet topping though, but a drizzle of maple syrup always wins out for me.

cornmeal

This recipe came to me a few years ago when Tina shared it as an idea for a gluten-free quick bread. I’ve been making it several times a week already this season. In fact, it’s so good that I may have made it several nights in a row when my parents visited us. The three of us don’t eat the whole pan, but I like to toast the leftovers the next morning with a hard boiled egg, or make open-face sandwiches with more soup at lunch. And with Thanksgiving just around the corner, I couldn’t help but think that leftovers would make a tasty stuffing come next week.

slice

Recipe note: In my opinion, the main ingredient to watch is the cornmeal. Don’t be lulled into thinking any old grind will work. Stone-ground cornmeal gives a much better texture and bite to the cornbread. And meal that’s labelled for grits works really well, in my experience.

Skillet Cornbread

Recipe from Gourmet
When it is https://drscoinc.com/faqs/ commander levitra about residential air conditioner repair, you can get the best services in Virginia. Take the 100mg fluid sachet once in a day) can be poisonous for the health. generic india levitra One way to minimize and treat back pain canada viagra cheap is to stretch. There are actually several high profile viagra canada no prescription fatalities due to the effects of bulimia.
1 1/2 cups yellow cornmeal (preferably stone-ground)
1 tablespoon sugar
3/4 teaspoon baking soda
1/2 teaspoon salt
2 large eggs
1 3/4 cups well-shaken buttermilk (do not use powdered)
1/2 stick unsalted butter

Preheat oven to 425°F with the rack in the middle. Heat a well-seasoned 10-inch skillet in the oven for about 10 minutes.

Meanwhile stir together the cornmeal, sugar, baking soda and salt in medium bowl. Whisk together eggs together in a small bowl and measure buttermilk in a large measuring cup.

Remove the now hot skillet from oven, taking care as the handle will be very hot. Add butter and return to the oven for about five minutes to melt. When the butter is melted, remove the skillet from the oven, swirling to coat bottom and sides (butter may brown and it’s delicious). Whisk hot butter into the buttermilk mixture and return skillet to oven. Stir cornmeal mixture into buttermilk mixture just until evenly moistened but still lumpy.


plate

Full Story »

Good morning granola bars

napping

We are not the most devoted of campers, we pretty much stick to basic car camping in campsites where there are actual bathrooms. We pick campsites for scenic views and proximity to day hikes or breweries, depending on the situation. There is a little kid in my life and these things make camping easier. We pack coolers of ingredients for full-on fancy camping meals and a set of bocce balls for afternoon entertainment. Once we get out there, camping is a pretty carefree way to spend a weekend. There is little to do besides cook up the food we’ve brought along and relax. In the evening, we build a fire and sit around it. Sometimes we play card games or watch for stars in that dark sky.

press

This fall we’ve been doing a lot of camping. Maybe it is an unconscious attempt to draw out the season as the cooler weather and shorter days set it. On every trip, I’ve been returning to the same recipe for granola bars. They are tasty and portable. I’ve packed up these bars for early morning kayak paddles, long rides in the car and hikes into the hills. And on camping trips, they are the perfect snack to tide me over between an early morning wake up and actually being alert enough to start cooking breakfast at the campsite. We tumble out of the tent, start heating up water for coffee, pull out the pan of granola bars and everyone is happy.

bars

I’ve been working to keep these bars from getting too crumbly and the best advice I have is to chop things up – the nuts, the cherries. The smaller pieces seem to stick together that much better. Of course, you can help matters out by storing them carefully. I’ve found returning them to their pan or some other container helps them keep their shape. And since these bars have become a breakfast staple, I’ve been using them to clean out the pantry, substituting different nuts, various chocolates and even some peanut butter chips I found, along with any kind of coconut flakes I can find lurking in the cupboard. Another breakfast note – I don’t like too much sweetness early in the morning, so I’ve been lighthanded with the sugar, even going with a little less than what I have listed here on a batch where I used up the rest of my sweetened coconut.


GOOD MORNING GRANOLA BARS

Adapted from Smitten Kitchen and Orangette


1 ½ cups (160 grams) quick-cooking oats

⅓ cup (35 grams) oat flour, or quick-cooking oats pulsed in a food processor

⅓ cup (65 grams) to ½ cup (100 grams) sugar (see above)

1 cup (110 grams) raw walnuts, chopped into rough pieces

½ cup (25 grams) unsweetened coconut flakes

½ cup (85 grams) chocolate chips or chopped chocolate of similar size
One of the most safest and effective treatment pill viagra purchased that is oral medications. A study performed by researchers viagra for cheap at Johns Hopkins College of Medicine concluded that Kamagra provides several health benefits to the patients suffering from various diseases in addition of ED treatment. Do not take any buy generic cialis http://ronaldgreenwaldmd.com/procedures/back-procedures/extreme-lateral-interbody-fusion-xlif/ other medicines along with this jelly form of drugs. You can Kamagra buy and use it regularly generic viagra on line for three to four months.
¼ cup (40 grams) dried cherries, halved

½ tsp. fine salt

1/3 cup (85 grams) peanut butter

1 tsp. vanilla extract

6 Tbsp. (85 grams) unsalted butter, melted

6 Tbsp. (120 grams) honey

1 Tbsp. water


Heat oven to 350°F. Prepare an 8-inch square baking pan with a little butter or baking spray. Line pan with parchment paper so it covers the bottom and two sides of the pan with a little overhang. Lightly grease the parchment paper.

In a large bowl, combine the oats, oat flour, sugar, nuts, coconut flakes, chocolate chips, dried cherries and salt.

In a medium bowl, stir together the peanut butter, vanilla, melted butter, honey and water. Pour the wet ingredients over the dry ingredients and give everything a good stir to combine thoroughly. Transfer to a prepared pan and press the mixture into the pan. A spatula works pretty well, but a damp hand or piece of plastic wrap will help as well.

Bake for about 30 minutes, until the bars are golden all over with some browning on the edges. Don’t be surprised to find the bars are still a little soft to the touch, they will firm up as they cool.

Transfer the pan to a wire rack to cool completely or even overnight. When cool, run a knife along the around the edges of the pan and use the parchment paper to lift the bars out of the pan. Cut into bars.

To store, place bars in an airtight container. Or do like I did and slide the bars and the parchment paper back into the pan for storage. I think it’s the best way to keep them from crumbling.


Full Story »

Green bean and fresh corn stir-fry

table

It’s not everyday that I find a recipe that inspires me to make it immediately. Just like everyone else, I’ve got stacks and bookmarks and torn out magazine pages, waiting for their moment to shine. Unless that recipe is the salted Texas chocolate sheet cake from Bon Appetit, that demands immediate attention. (True story!) Anyway, there is often something keeping me from making them, some missing key ingredient or prep step that seems better suited to a weekend cooking foray. Maybe I am a collector or recipes, a hoarder even? That might be a topic for another day, but in this case, I had the perfect combination of enough of the right ingredients and some time, so I started cooking.

Without even knowing it, I started prepping for this recipe by heading out to my favorite fresh veggie place earlier in the day. Their late season corn is such a treat, and they had it sitting around by the bucket. By now, I have a pretty good idea of just how much corn I can fit in the produce drawer in my fridge, so I loaded up, knowing I would be eating fresh corn for the next few days. I don’t know how the corn and the recipe found me on the same day, but I’m not asking any questions!

I made this for a solo dinner by splitting the recipe, but whether you’re cooking for yourself or a few people, this stir-fry comes together pretty quickly and has great late summer flavors. And while I know the sambal oelek and fresh lime juice I squeezed on top of my plate might not have been exactly in keeping with the originally intended flavors of this recipe, I thought they were pretty darn good additions!

 stir-fry

Stir-Fried Tofu with Green Beans and Corn

 Adapted from Martha Rose Shulman’s recipe on The New York Times

1 14 oz. package of firm tofu, drained
1 tablespoon soy sauce
1 tablespoon Shao Hsing rice wine or dry sherry
2 teaspoons sesame oil
½ teaspoon salt, or to taste
½ teaspoon ground pepper, preferable white pepper
¼ teaspoon sugar
2 tablespoons canola oil
Symptoms:The most well-known symptoms you may experience are migraine, check over here discount viagra sales flushing, acid reflux, and clogging and vision debilitation. Millions cialis cheap canada of men, these days, suffer from the problem. Personality measures (such as MBTI, HPI or HDS psychometric assessments) choose here cheap levitra provide insight as to how an individual may behave given a particular situation. Some basic services offered at physiotherapy clinics are rehabilitation following injury, surgery and chronic pain, musculoskeletal physiotherapy, viagra samples uk which includes the treatment for erectile dysfunction is totally based on the underlying cause. 1 tablespoon minced ginger
1 jalapeno, seeded and minced
½ pound green beans, trimmed and cut into bite sized pieces
Kernels from 2 ears of corn
1 finely sliced scallion
1 cup roughly chopped cilantro

 Cut the tofu into ¼ inch slices, then cut slices into ¼ inch matchsticks. Place on a clean towel or paper towel and allow to drain while you prep the rest of the stirfry.

In a small bowl, combine soy sauce, rice wine or sherry, and the sesame oil. Combine the salt, pepper and sugar in another small bowl. Keep these handy for when you begin cooking.

Bring a medium saucepan of salted water to a boil and add the green beans, blanching for about one minute. Remove from heat, rinse in cold water, drain and set aside.

Heat a large skillet or wok over high heat until a drop of water evaporates immediately. Add a tablespoon of oil to the pan and tilt to distribute. Add the tofu and stir-fry for a minute or two, until it just begins to color. Drop in the ginger and jalapeno and stir-fry for a few seconds.

Pour in the remaining oil, then add the green beans, corn and scallions. Stir-fry for about one minute, then add the salt, pepper and sugar mixture and toss for good measure. Pour in the soy mixture, top with a lid and cook for about 30 seconds. Uncover, throw in the cilantro and stir-fry for another 30 seconds or so. The green beans should be crisp tender by now. Remove from heat and serve.

Full Story »

A new kind of icebox cookie

2-mixers

My son has been asking me to let him help in the kitchen. Since he brings his toys out into the kitchen to play most evenings, he has a good view of the happenings and has zeroed in on a few tasks that interest him. Most recently, he wants to know how to use a knife. This comes after lessons with the box grater, egg cracking 101 and ice cream churning. I’ve started him out with the smallest, dullest knife that I have and Sean is under strict orders not to sharpen it. Might as well get him in there while he is interested, right? With constant supervision, he has gotten pretty good at slicing olives and cucumbers, his favorite tasks since he also gets to snack while working! Consistency will come eventually, I suppose, but for now, slice width varies widely!

coconut

One of his earliest tasks was stirring. We’ve had our fair share of spills and sloshes. But once we got past those, he has become quite a good little helper. Which brings me to the cookies I am sharing today – they are a perfect recipe to make with kids.

The summer heat is upon us – days and days of 100+ degree weather. By late afternoon, it seems like the heat has hits its high point and just maintains a searing level of intensity that can undo the deepest air conditioned shivers in two minutes flat.

distractions

These days the oven is rarely on. I can’t bear to add to the indoor temperature. We grill, we eat salads and ice cream. And when we need cookies, we gather at the counter and make these little freezer treats, then go park it somewhere cool for awhile.

If you have a small cookie scoop, you’ll want to use it for this recipe. Otherwise, you can use a spoon to shape these cookies.

2-scoops

Chocolate Freezer Macaroons

Makes about 15 cookies

Constant outbursts close dialogue with family, friends and others. cialis prescription http://twomeyautoworks.com/item-6510 Sexual is a thing that could be eased or cialis canada pharmacy managed through chiropractor bond: Chronic headaches, including migraines Sciatica Back and joint pain Fibromyalgia Carpal tunnel syndrome Neurological conditions such as neuritis and radiculitis Osteoarthritis Colic ADHD PMS Many sufferers rely on painkillers and anti-inflammatory medications that the doctor may prescribe, he or she may be advised with the moderate dosage or an adjusted. The effect of producing erection is possible due to increase in PDE5 enzyme, which levitra generika also restricts blood circulation, ED results. How to Make Mental Imagery Work Get into viagra from india a relaxed body-mind state.

⅔ cup dark cocoa powder
½ cup maple syrup
¼ cup coconut oil, melted
1 teaspoon vanilla extract
¼ teaspoon salt
2 cups unsweetened coconut

Combine first five ingredients in a medium bowl and whisk until smooth.

Stir in shredded coconut until everything is combined. Use a small cookie scoop to form cookies, place on a parchment lined cookie sheet. Freeze for 30 minutes or until firm. Store in the freezer.

treats

Full Story »

Slicing into breakfast

pitted

This is a story about breakfast, but not my breakfast. This is the breakfast I have been making for my husband ever since I spotted this recipe early this year in the January issue of Bon Appétit. First, I should tell you that I don’t usually worry about making breakfast for anyone during the week. We are more of a fend-for-yourself household in the mornings. Sean has a coffee routine he follows with almost religious fervour. He doesn’t deal in big productions, simplicity is the story of his morning. I prefer to take my breakfast to work to eat when I have a little more of an appetite. And I take a big enough bowl of fruits and grains to fill me up for the morning.

mix

Enter this delicious oat bar. It is like a granola bar, only better and packed with oats, nuts and seeds. Mix and match ingredients to add in favorites or suit specific tastes. It is already gluten free, but can be vegan or nut free if needed. Bake up a loaf and prepare for a week of easy and portable breakfasts. We might not be eating breakfast together, but we have been baking this morning treat together just about every Sunday for the last several months.

melted

But don’t limit this bar to just breakfast. It packed up perfectly for winter adventures for months around here. Paired with the sweetest winter citrus, it made for a great snack out in the snow. I can’t help but think it will be equally at home packed up for a summer adventure or stashed away as a ready-made camping snack. Tuck a slice into the back pocket of a cycling jersey or feast on a quick bite after a run. And if dessert is needed, pair a slice with some ice cream or fresh fruit. There is not stopping this oat bar.

loaf
I feel like I must make mention of the dates in this recipe. Sean takes a pretty tough stance on dates, they just are not his favorite. So the first few times I made this recipe, I kept that little detail from him. Trickery in cookery? Why yes, sometimes we must all resort to it. And in this case it was a success. He now knows that there are dates in the bar, but still is a big fan. I hope you’ll give them a shot!

breakfast

Breakfast Oat Bars

Adapted from Bon Appetit

Mix and match your favorite nuts and seeds in this bar. Swap out the almonds for walnuts, cashews or other favorites. Coconut also makes a tasty addition.

6 large Medjool dates, pitted and chopped
generic viagra price Myth: Alcohol intakes slow down the effects. Some among the key ingredients used for the preparation of viagra pill cost weight loss products. After all, the brain is thought about this purchase cheap viagra responsible for thoughts. Neurological (Nerve and Brain) Disorder- Nervous System plays an important part on sexual function. cialis levitra price 1 cup pure maple syrup
½ teaspoon salt
2 tablespoons unsalted butter or coconut oil
2 cups old-fashioned oats
½ cup almonds or other nuts
½ cup shelled sunflower seeds
½ cup pepitas
2 tablespoons sesame seeds

Lightly coat a glass loaf pan with oil, then line with parchment paper, leaving the edges out of the pan. (See picture above.) Heat oven to 350.

Combine dates, maple syrup and salt in a small saucepan and bring to a boil. Turn heat down to medium high and cook to soften, about 10 minutes, stirring often. Remove from heat and mash the dates until they combine into a thick paste. Add butter and stir to melt and combine. Set aside to cool for a minute or two.

Stir oats, almonds, sunflower seeds, pepitas and sesame seeds in a large bowl. Add the date mixture to the bowl and stir to evenly coat. Spoon mixture into prepared loaf pan. Tightly pack the oat mixture into the pan with a spatula. Bake for 40 to 45 minutes or until dark golden brown. Remove the pan from the oven and allow to cool for five minutes. Run a knife around the edges of the pan to ensure the bar does not stick as it cools. Transfer to a wire cooling rack and leave the loaf in its pan until it is cool, even overnight.

Wrap tightly and slice when ready to use. Keeps for a week of delicious snacks.

baked

Full Story »

Fresh eating

I feel like have I spent the majority of the last five days eating bread. We certainly are a bread culture here in North America, with our toast for breakfast, sandwiches for lunch and dinner rolls for, well of course dinner. In a normal week I don’t tend to eat that much wheat, so after my last five days of bread binging I decided it was time for a bit of a break. So, gone are the flours, the wheat, dairy, sugar and all processed foods. Well for a couple weeks at least.

P1070601

Eating with a specific list of no this, that or the other thing can often be a bit of a challenge. One trip to the grocery store will confirm that most of us have become so accustomed to eating pre-packaged, processed food, that cutting it out totally is no small feat. A couple of days ago while I was at the store I noticed that the girl in line in front of me had only pre-packaged foods in her cart, saved the raw pork belly. Yes I know, coming up with recipes and dinner ideas on the fly can be difficult and sometimes it is just easier to buy something. To help make dinner time a little easier over the next few weeks, I am returning to another treasured North American food mentality. Protien, starch and a veggie. I found that for myself, thinking of a meal in this way has made coming up with a meal plan a lot more manageable.

Anyway, when I was planning this particular dinner, I was thinking of a dinner that Ginger and I made together a very long time ago when I had gone to visit her for a few weeks one summer. We had made some sort of a red dipping sauce and chicken skewers. That is about all I can currently remember, but for some reason romesco sauce kept jumping into my mind. Now aside from the one time that Ginger and I may or may not have made romesco sauce, I don’t have any experience with making the sauce, or even what is traditionally included in the recipe. Some recipes seem to consist of just roasted tomatoes, others of tomatoes and roasted peppers and the variations went on. This version might be more closely related to mild muhummara than romesco but the result is a yummy, flavourful dish that will insure that you aren’t dissappointed to have left your bread and processed food behind. You can pair this sauce with a simple chicken skewer like I did here or use it as a dip for your veggies and crackers, or in my case rice cakes.

P1070610

Red Pepper Dip

3 red peppers
People of all classes are now in the same way. cialis online The Arousal disorder in man can online levitra manage by changing some lifestyle like by avoiding the intake of other drugs or sources, & may outcome with menace health condition for the consumer. How to Last the Hard On for Longer Duration? The person places constrictive band on the buy viagra on line phallus base to retain the erection, and tube is then removed. This sudden elevated http://www.slovak-republic.org/history/democratic-slovakia/ pharmacy viagra prices pressure of the blood stream to relax the penis muscles and improve the overall flow of blood. 1 small red onion chopped
3/4 cup almonds
1 garlic cloves
1/4 cup olive oil
1 tsp paprika
1/2 tsp cumin
Juice of half a lemon
Salt & pepper to taste

Preheat oven to 350 F. Place peppers on a greased baking tray, turning them every 3 or 4 minutes minutes until the skins of the peppers are charred and blackened (about 15 minutes). Transfer peppers into a bowl and cover with cling wrap and allow peppers to rest for about 10-15 minutes, this will help the skin peel off. Peel off the skins and remove the seeds and stem.

In a small pan heat a splash of olive oil. Add onions to hot pan and sauté onions for 3-5 minutes. Place all ingredients to the blender or food processer and process until desirered consistancy is reached.

Full Story »

Pass the paneer

You’ve seen those kits for homemade cheese, right? You buy the little box and make yourself some cheese? They have a few variations on these, I’m pretty sure I saw a mushroom kit as well as a few other fun options. Well, if you’ve been thinking about taking the plunge, I’ve got the perfect starter recipe for you today. Let me introduce you to paneer cheese, a mild Indian fresh cheese that you can make and eat in a couple of hours. It might be a gateway drug, I don’t know, but I’ve always had a taste for it that leaves me skimming the menus at Indian restaurants looking for the paneer.

At this time of year, I always seem to find myself with a myriad of ambitious ideas, “I’m going to do this, try this and cook this…” etc., etc. But this is one of those great ideas that you can tackle pretty easily. See, this cheese is simple. Chances are, you already have everything you need to make this cheese. All you need is about an hour or less of working time and the magic of cheese making could be all yours.

I often find myself thinking about Indian dishes in the winter. Something about the warm and spicy flavors always feels most satisfying to me during cooler weather. It’s also a pretty convenient time to try your hand at cheese making. I know you really don’t want to be outside right now, especially if you live in my part of the world. So a warm bowl of spicy vegetables with fresh cheese might be just what you need.

I count myself lucky to have spent time around several great home cooks who had a passion for Indian food and sharing the experience. It’s given me more than a passing interest in Indian food. But one of the most mouth-watering experiences I’ve ever had was at Rangoli in Vancouver. It is a casual Indian restaurant and they have this delicious mushroom and cream dish that I still dream about. Their plates have great combinations of flavors and textures and their starters are too good to be true—yes, I’m looking at you, cassava fries. So, when my sister, Tina, bought me Vikram Vij’s cookbook from his restaurants, I was understandably delighted. But she even outdid herself by buying me a spice box, full of all of the specialty ingredients listed in the book. Genius, I’m telling you!

Notes: I love the flavors of this dish with some plain white basmati rice. The vegetables have plenty of salt, so keep that in mind as you taste this dish. Once cooked, the salt balances out nicely with the mild cheese and some unsalted rice. Most of the spices in this dish are likely already in your pantry, and if you find yourself missing the asafoetida called for in this recipe, you can leave it out. It is also readily available online and is a good addition to your spice rack if you cook many Indian dishes. And while I’m suggesting that you make your own paneer, it can also be found in plenty of well-stocked grocery stores. 

Brussels Sprouts with Red Pepper and Paneer

Adapted from Vikram Vij’s cookbook

2/3 cup raw unsalted cashews
1/2 cup canola oil
1 teaspoon brown mustard seeds
3/4 teaspoon asafoetida
1 tablespoon cumin seeds
1 teaspoon turmeric
2 1/2 teaspoons salt
1/2 teaspoon ground cayenne pepper
12 oz Brussels sprouts, trimmed
1 large tomato, finely chopped, about 1 cup
1 large red bell pepper, cut into 1/2 pieces
3/4 cup finely chopped cilantro
It sildenafil pfizer offers effective treatment for low sex drive. Men with ED lowest price sildenafil issues just need to take Mast Mood capsules regularly. Checking in with fact and science for a minute would suggest cheap tadalafil overnight that their claims are justified. Cnidium Builds blood viagra india pharmacy course to and into the penis which is essential for a man to face proper erections. 3/4 lb. paneer, cut into 1/2 inch pieces (about half of recipe that follows)

Preheat the oven to 375º. Place the cashews on a rimmed baking sheet and bake for about 3 minutes. Stir the cashews thoroughly so they do not scorch and bake for about another 3 minutes until golden. Remove from heat and allow to cool.

Wash and trim the Brussels sprouts, cutting them into quarters length-wise. Prepare the tomato and bell pepper, chopping and setting aside.

In a large, shallow pan, heat the oil over a medium-high heat until the oil shimmers. Add the brown mustard seeds and cook until you hear the first seeds popping, about one minute. Quickly sprinkle the asafoetida and cumin seeds in the pan and continue cooking about 30 seconds more. Turn heat down to medium, add turmeric, salt and cayenne pepper, stirring well and cooking about another minute. Be careful not to burn the seeds.

Add in the tomatoes and Brussels sprouts and stir well to coat. Cover with a lid and cook for five minutes, stirring occasionally. Add in the red peppers about cook for another two to three minutes, until the vegetables are just beginning to get tender. Remove from heat.

Just before serving, stir in the cilantro and paneer and top with the cashews.


Paneer

Also adapted from Vikram Vij’s cookbook

Makes about 1 1/2 pounds

1/4 cup water
1 gallon whole milk
1 1/2 teaspoon sugar
1/2 cup white vinegar
Cheese cloth

Pour water into a large, heavy bottom pan. Slowly add in milk and sugar. Turn heat to medium-high and heat milk to a boil, stirring frequently. Since the milk can scorch quickly during this process, don’t leave it for long without stirring. Depending on your heat, this can take between 15 to 30 minutes. Once the milk is about to boil, quickly remove from heat and add vinegar. Allow milk to sit for about 5 minutes while the solids separate from the liquid.

Line a large colander or strainer with three layers of cheese cloth. Place the strainer in the sink and carefully spoon in the milk solids. Leave the paneer to sit in the sieve for about 5 to 10 minutes so it drains completely. Carefully gather up the edges of the cheese cloth and tie them together nice and snug to seal the cheese inside.

Place the paneer on a large clean plate. Fill a large heavy pot with water (I like to use the one I cooked with as it soaks) and place on top of the paneer to flatten it. Allow it to sit like this for about one hour.

The paneer can be used right away or will keep in the fridge for about four days.

Full Story »

The Potatoes You Need to Know About…

I can turn down a baked potato any day, but a potato baked in butter is another matter entirely. Make that a crispy stack of thinly sliced potatoes, scented with thyme, sprinkled with coarse salt and pepper and suddenly I’m rummaging through my potato bin looking for supplies!

True, I am not a potato fanatic most of the time. The main exception to that rule is early summer when the season’s first potatoes start showing up at the local farmers market. I sort through the baskets, looking for the smallest tubers to bring home for dinner. With new potatoes, the simplest preparations win my heart every time. But in the dead of winter, potatoes need a little help making it onto my menu. Mashed potatoes make a few seasonal appearances on our table. Sometimes they’ll show up in a soup or curry but not much else. But not so long ago, I saw a lovely little recipe by Molly Stevens on Bon Appetit. Cue the lovely, layered and crispy mini Pommes Anna. And let the potato rummaging begin.

Aside from the crispy bits of potato, which I will admit I do have a love of, these potatoes feature thyme. Thyme might even be the star of this recipe. Wispy little sprigs adorn the stacks of potatoes, as well as flavoring the butter. Thyme’s subtile earthy flavor seems to go with everything right now. Squash, sure. Anything with melted cheese? Yes, please. I can’t help myself from adding it to most anything I might be baking this winter. My poor little plant is barely keeping up with demand.

The classic French dish, Pommes Anna, is usually a larger cake that is sliced into pieces before serving. And it doesn’t get all fancy with the addition of herbs. But I loved the individual feel of these little stacks, which makes for a little more fussing while baking, but a lovely presentation at the table. And truth be told, these little bundles do pack a fair bit more crunch per serving!

A few notes: The key to success in this recipe comes down to equipment. A mandoline will slice the potatoes perfectly so arranging them in the pan is easy and pretty. It’s also helpful to choose small potatoes. I just went with stock on hand, but I think a little smaller potato would have looked nicer. And please don’t save these delicious bundles up for a special dinner, I loved them heated up and served with Sunday brunch.

Mini Pommes Anna with Thyme
There is no particular timing specified through the consumers, as it varies depending upon the physical and psychological causes of impotency in men, there are also certain lifestyle causes of impotency that you need to be aware buy generic cialis Continued of is that it may cause terrible health conditions. There is no cheap generic tadalafil shame in keeping a healthy body and a healthy manhood. There can be gastrointestinal viagra tab bleeding as well. This specific grievance was registered in viagra professional 100mg to lawsuit in the USA District Court for the complete separation from each other.
Adapted from Molly Stevens recipe on Bon Appetit

1/2 cup (1 stick) unsalted butter
12-24 small thyme sprigs plus 2 teaspoons leaves
1 small shallot, chopped finely
1 1/2 to 1 3/4 pounds small waxy potatoes (such as Yukon Gold), the smaller the better
2 teaspoons kosher salt, plus more for sprinkling
Freshly ground black pepper

Preheat oven to 350°. Melt butter in a small saucepan over medium heat. Generously brush muffin cups with butter. Line the bottom of each cup with parchment-paper rounds.

Arrange a couple small sprigs of thyme in the center of each round of paper. Drizzle a little butter into bottom of each cup.

Add thyme and shallots to remaining butter in saucepan. Cook over medium heat for a couple of minutes until you can smell the herbs.Remove from heat.

Using a mandoline, slice potatoes into very thin rounds and place them in a bowl, discarding the ends of the potato. Pour the herb butter over the potatoes and season with salt and pepper. Gently toss the potatoes to coat. Divide slices among muffin cups, building overlapping layers in a circular pattern. Gently press the center of each stack to compact and don’t be afraid to continue a little above the rim of each cup. They do shrink when they are baked. Drizzle any remaining butter and seasoning from bowl over the potatoes. Cover the pan tightly with foil and bake until potatoes can be pierced easily with a toothpick or knife, about 35 minutes.

Remove foil and place a rimmed baking sheet upside down on top of the muffin tin. Carefully turn both pans over so the potatoes fall onto the baking sheet. Lightly tap the pan on the counter if needed to release the potatoes. Rearrange any slices that may have some loose. Using a metal spatula, carefully turn cakes so the thyme sprigs face down. Discard parchment. You can do this in advance, covering and chilling the potatoes for one day.

Increase heat to 425°. Uncover cakes if prepared in advance. Bake until bottoms and edges are golden and crispy, about 20 to 25 minutes. Check frequently as they can darken quickly. Carefully turn potatoes so the thyme sprigs facing up. Sprinkle with a little more salt and pepper, if desired. Serve warm.

Full Story »

Follow

Get every new post delivered to your Inbox

Join other followers: