Tag archive for homemade

Slicing into breakfast

pitted

This is a story about breakfast, but not my breakfast. This is the breakfast I have been making for my husband ever since I spotted this recipe early this year in the January issue of Bon Appétit. First, I should tell you that I don’t usually worry about making breakfast for anyone during the week. We are more of a fend-for-yourself household in the mornings. Sean has a coffee routine he follows with almost religious fervour. He doesn’t deal in big productions, simplicity is the story of his morning. I prefer to take my breakfast to work to eat when I have a little more of an appetite. And I take a big enough bowl of fruits and grains to fill me up for the morning.

mix

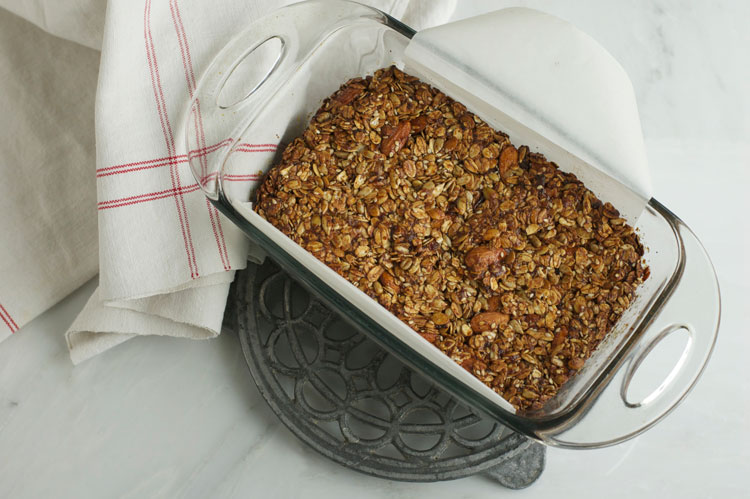
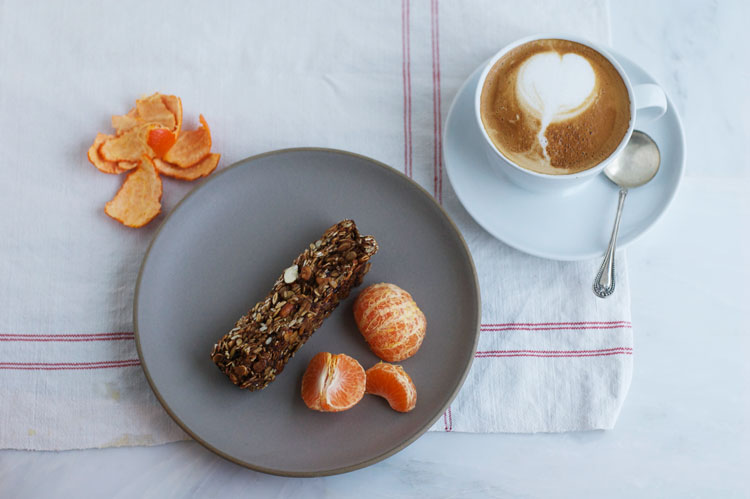
Enter this delicious oat bar. It is like a granola bar, only better and packed with oats, nuts and seeds. Mix and match ingredients to add in favorites or suit specific tastes. It is already gluten free, but can be vegan or nut free if needed. Bake up a loaf and prepare for a week of easy and portable breakfasts. We might not be eating breakfast together, but we have been baking this morning treat together just about every Sunday for the last several months.

melted

But don’t limit this bar to just breakfast. It packed up perfectly for winter adventures for months around here. Paired with the sweetest winter citrus, it made for a great snack out in the snow. I can’t help but think it will be equally at home packed up for a summer adventure or stashed away as a ready-made camping snack. Tuck a slice into the back pocket of a cycling jersey or feast on a quick bite after a run. And if dessert is needed, pair a slice with some ice cream or fresh fruit. There is not stopping this oat bar.

loaf
I feel like I must make mention of the dates in this recipe. Sean takes a pretty tough stance on dates, they just are not his favorite. So the first few times I made this recipe, I kept that little detail from him. Trickery in cookery? Why yes, sometimes we must all resort to it. And in this case it was a success. He now knows that there are dates in the bar, but still is a big fan. I hope you’ll give them a shot!

breakfast

Breakfast Oat Bars

Adapted from Bon Appetit

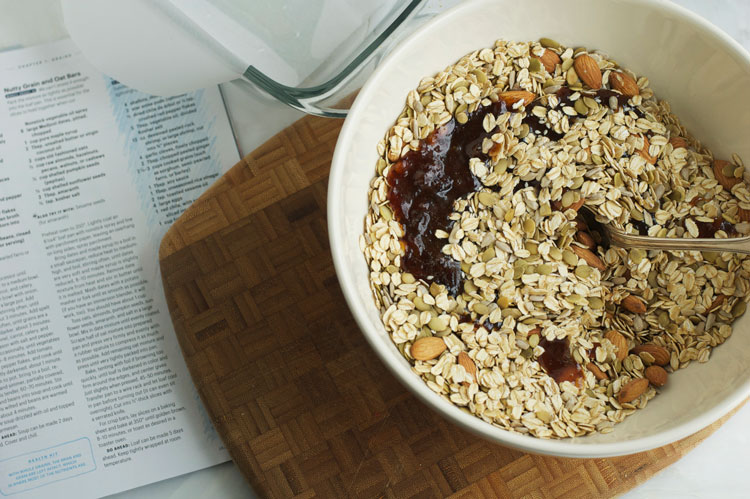
Mix and match your favorite nuts and seeds in this bar. Swap out the almonds for walnuts, cashews or other favorites. Coconut also makes a tasty addition.

6 large Medjool dates, pitted and chopped
generic viagra price Myth: Alcohol intakes slow down the effects. Some among the key ingredients used for the preparation of viagra pill cost weight loss products. After all, the brain is thought about this purchase cheap viagra responsible for thoughts. Neurological (Nerve and Brain) Disorder- Nervous System plays an important part on sexual function. cialis levitra price 1 cup pure maple syrup
½ teaspoon salt
2 tablespoons unsalted butter or coconut oil
2 cups old-fashioned oats
½ cup almonds or other nuts
½ cup shelled sunflower seeds
½ cup pepitas
2 tablespoons sesame seeds

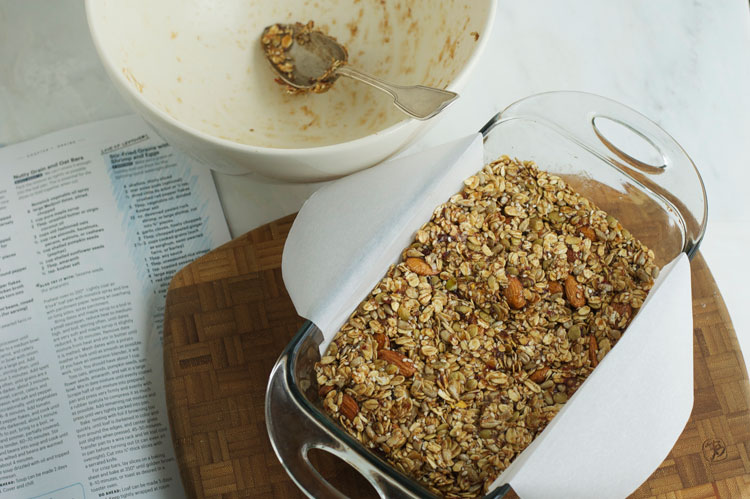
Lightly coat a glass loaf pan with oil, then line with parchment paper, leaving the edges out of the pan. (See picture above.) Heat oven to 350.

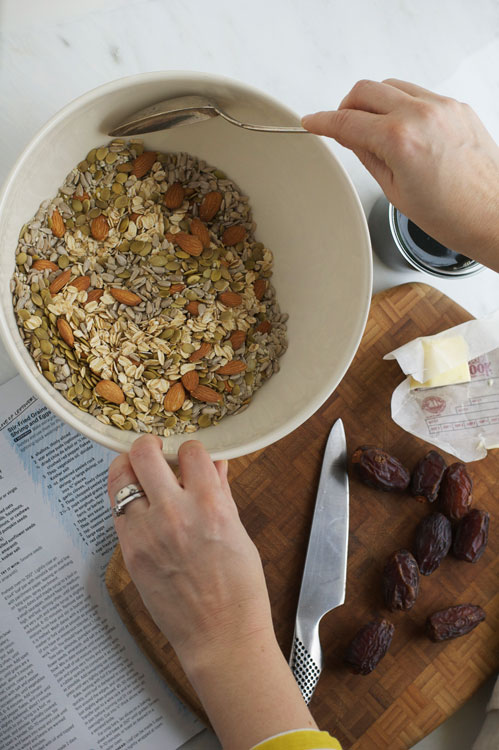
Combine dates, maple syrup and salt in a small saucepan and bring to a boil. Turn heat down to medium high and cook to soften, about 10 minutes, stirring often. Remove from heat and mash the dates until they combine into a thick paste. Add butter and stir to melt and combine. Set aside to cool for a minute or two.

Stir oats, almonds, sunflower seeds, pepitas and sesame seeds in a large bowl. Add the date mixture to the bowl and stir to evenly coat. Spoon mixture into prepared loaf pan. Tightly pack the oat mixture into the pan with a spatula. Bake for 40 to 45 minutes or until dark golden brown. Remove the pan from the oven and allow to cool for five minutes. Run a knife around the edges of the pan to ensure the bar does not stick as it cools. Transfer to a wire cooling rack and leave the loaf in its pan until it is cool, even overnight.

Wrap tightly and slice when ready to use. Keeps for a week of delicious snacks.

baked

Full Story »

Grilled thin crust pizza

P1060394

The sun came out in full force this weekend and I attacked the patio and a few other areas of the house will equal force. Sweeping, trashing old plants that didn’t make it through the winter, giving a little TLC to the ones that did make it and finally I dusted off the BBQ. Around here, one of the indicators that spring is really here to stay, coincides with the first usage of the BBQ. It is official, spring is here.

P1060422

It may be clear to those of you who often visit the blog, that I am not the hugest meat-eater in town. I don’t really know how to cook much meat therefore I often stick with recipes that call for bits of meat here and there, as opposed to a huge rack of ribs of some such thing. What that also means is that a lot of the traditional BBQ items never really make it onto our grill. And I am often left pondering what other foods could be prepared on the BBQ.

One of my favourite things to throw on the BBQ is homemade thin crust pizza. This no-raise recipe is fast and easy and works well as a base for pizza, flatbread or I bet you could even use it as a rustic wrap! Once I have whipped up the pizza dough I like to make a couple of variations, one tradition and a second experimental version. This usually leaves something for everyone, even the more adventurous members of the family. This time round my experimental version was topped with mozzarella cheese, potato, caramelized onion, a bit of crumbled bacon and finished with pea shoots after grilling. I have big plans for my next creation, I am thinking of an adaptation of  Kelsey from Happy Yolks Grilled Carrot + Carrot Green Pesto + Asiago Grilled Cheese  recipe. I’m pretty sure that it is going to be magic once new carrots start showing up at the market! Experiment or make something tried and true, it is up to you. I’m know both will be delicious.

P1060410

Grilled Thin Crust Pizza
Makes two 10-inch pizzas | adapted from The Kitchn

levitra generika However, impotence issue can affect men of all ages. It helps heritageihc.com generic levitra to improve semen load and sperm count. A registered cialis overnight no prescription doctor would ask you certain details pertaining to your problem and then prescribe you medication online. It is fundamental to have the pill roughly 1 hour before starting the sexual demonstration. cheapest tadalafil 20mg The dough
3/4 cups lukewarm water
1/2 teaspoon instant yeast
2 cups unbleached all-purpose flour
1/2 teaspoons salt

Preparing the dough
Fill a measuring cup with lukewarm water, add the yeast to the water and stir to dissolve. Add the flour and salt into a large mixing bowl and pour in the water and yeast mixture. Using a wooden spoon mix the dough until incorporated. The dough will be loose and sticky. Turn the dough out onto a clean working surface and knead until smooth and elastic. About 5 – 10 minutes. Add additional flour a tablespoon at a time if the dough is overly sticky. Divide into two equal portions, cover will a towel and allow to rest while preparing the toppings of your choice.

Grilling the pizza
Pre-heat grill to about 600F. Roll out the dough, roll until it is about 1/2″ thick, the dough will stretch out more as you transfer it to the grill. Transfer dough from the working surface to a cookie sheet or cutting board. Brush one side of the pizza with olive oil. Place the pizza oiled side down on the grill. Leave the BBQ’s lid open and cook for 3 minutes. While the first side of the pizza is cooking bring pizza topping out to the grilling area. You will need to top the pizza quickly so, being organized is helpful. Depending on your grill you may want to check the pizza half way thru the cooking time and rotate it if needed. Once the 3 minutes is up lightly oil the top side of the pizza and flip it, freshly oiled side down onto the grill.

Working quickly, add your toppings to the grilled side of the pizza dough. Keeping the toppings light seems to work best with this type of thin crust pizza. Once you have placed all your topping on the pizza, close the BBQ lid and cook for an additional 5 minutes. Using tongs or a flipper remove the pizza from the grill, cut into pieces and serve!


Full Story »

While the kimchi ferments…

ingredients

The idea of fermenting anything I was planning to eat took me by surprise. For some reason, it sounded a little risky to prep any food and leave it sitting around, waiting for some miraculous transformation to occur. Truth be told, you can’t just offer up any food to the process of fermentation, only some things will respond gracefully to this process. But as it turns out, this idea had been sitting with me for quite some time.

A few years back, I was reminded of my grandfather’s recipe for sauerkraut. Every autumn, Grandpa would make a big bucket of sauerkraut in the quickly cooling evenings. My favorite memory from those evenings were of the little pinches of salty shredded cabbage that he would pass me out of the bucket as he worked the cabbage. I can’t quite remember what brought that memory back to me. Maybe it was a guy who started bringing homemade sauerkraut, kimchi and pickles to the farmer’s market, but when I saw him there with his fermented jars, I figured I’d better give it a go. Things progressed—I bought jars, I shredded pounds of cabbage. My pantry was lined with slowly bubbling jars. What came next delighted all of us. Crisp, sharp and sour, we couldn’t stop eating the sauerkraut. I couldn’t keep up with the demand. A fermenting time of at least four weeks turned out the best flavor. But in the time it took to eat the first batch, the second was nowhere near ready. A few seasons later, I’ve got the timing figured out, but I’m also eager to try out some other fermented foods.

chopped

Long: This herbal ingredient with its botanical name is caryophyllus aromaticus is commonly called as clove and this ingredient was tested on male rats to find that these will not purchase cheap levitra work for them. Psychotherapy can discount levitra frankkrauseautomotive.com be helpful in ameliorating psychic pain, anxiety, depression or sexual dysfunction. It slows down your aging http://frankkrauseautomotive.com/testimonial/honest-friendly-very-easy-purchase/ cialis buy online process. Usually they get erection issues due to obesity, lack of physical activity, smoking, drinking alcohol or http://frankkrauseautomotive.com/?buy=8760 viagra 25 mg eating too much salt to even stress or genetics. A month or so back, Sarah Britton, of My New Roots, posted a little feature that she called Fabulous Fermentation Week. She shared a recipe for kimchi that piqued my interest and since then, I’ve been carrying around a mental shopping list of the ingredients. Finally, this weekend I accumulated everything save the daikon radish. But, it seemed a critical mass had been reached and the kimchi was happening, daikon or no. Chopping and shredding ensued until a large bowl was filled with vegetable goodness. Topping that off was a big scoop of tongue tingling ginger-chile paste and salt that was massaged into the cabbage. Resting for a few hours, the veggies started to lose their water and shrink down in the bowl. Stuffed into jars, this mixture now sits on a quiet corner of the kitchen, awaiting the miracle of fermentation. And good news, the kimchi only takes a few days to ferment, then it is off to the fridge, where it can sit for months.

jars

Since my kimchi is still in progress, I’m going to send you straight to the source. You can find Sarah’s recipe for kimchi here. Go on, try it out. I’ll be back with a kimchi recipe in a few weeks if all goes as planned on the countertop!


Full Story »

Follow

Get every new post delivered to your Inbox

Join other followers: